Our programs are collaborative hands-on experiences that help you comprehend concepts and guide you in trying out many of the latest tools, techniques, environments, and resources used by professionals managing production-grade cloud deployments for corporations, governments, and not-for-profit organizations. This lesson will walk you through the steps to get your workstation ready for the explorations to come.
I suggest that you use a computer you own, not the one provided to you by your employer. This will help you avoid most of the network/firewall/routing issues and admin permission problems you are likely to run into. It will also help you follow your company's policy regarding employee use of corporate equipment.
Instead of loading up your computer with the burden of running cloud exercises, we plan to use a cloud-based machine as your Cloud Genius Workstation. AWS Cloud instances come with 8 GB space, but we need more. So, we provision the CloudGenius Workstation with a 28 GB SSD disk.
Note: We select 28 GB size to stay within AWS free tier storage limit of 30GB.
Windows users: Cloud Genius Workstation in AWS Cloud
Setup Cloud Genius Workstation in the AWS cloud FREE TIER.
https://aws.amazon.com/free
Read the terms of the free tier offer from Amazon carefully and sign up for an account with Amazon cloud. You can use your amazon shopping email for the same to save on time.
On your Windows computer, start an elevated PowerShell
Choosing to "Run as administrator" elevates the privileges of the process you run.

Enable PowerShell execution policy
PS C:\> Set-ExecutionPolicy -ExecutionPolicy RemoteSigned -Force
Initialize AWSPowerShell.NetCore
# Step 1
PS C:\> wget -o installation.ps1 https://s3-us-west-2.amazonaws.com/cloudgeniuscode/installation.ps1
# Step 2
PS C:\> ./installation.ps1
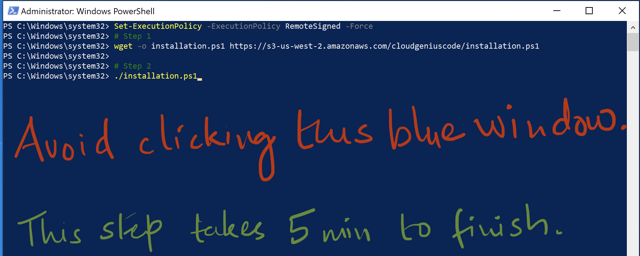
Setting up AWSPowerShell.NetCore
Please close that elevated powershell.
![[sketch-close-elevated-shell]]
Create and connect to the Cloud Genius workstation in AWS cloud
Please work in OREGON region in AWS

Create Company Keypair with AWS Free Tier https://aws.amazon.com/free
This account gives you access to a micro sized machine for 12 months for free. AWS calls it AWS Access Key and Secret but I like to call it Company Keys.
I like the phrase
Company Keypairbecause they let you access the company resources programmatically.
Read this AWS blog post on how to quickly find your access and secret keys from AWS.
Look for a section named: Generate access keys for programmatic access
Do not share your
AWS Access KeyandSecret Access Keywith anyone.
Create credentials Access Key and Secret from AWS and make a note of those for use in the next step.
Start Windows Powershell
Do not "Run as administrator" just click open.
Set AWS credentials
Make sure to change CHANGETHIS & REMEMBERTOCHANGETHIS before running in PowerShell. All those lines together is just one command
Set-AWSCredential `
            -AccessKey CHANGETHIS `
            -SecretKey REMEMBERTOCHANGETHIS `
            -StoreAs AWScreds
Copy the whole thing you see above and paste into Notepad. In Notepad, replace
CHANGETHISandREMEMBERTOCHANGETHISwith your values for Access and Secret you obtained from AWS.Then copy all of these lines from notepad and paste into powershell. Remember, this is just one command. It is a multiline command.
# All of this is just one step in PowerShell.
Set-AWSCredential `
                 -AccessKey CHANGETHIS `
                 -SecretKey REMEMBERTOCHANGETHIS `
                 -StoreAs AWScreds
The animation below that demonstrate how to paste this multi-line command into PowerShell.
Setup a Machine keypair and a Security Group for the Cloud Genius Workstation
A Machine keypair is typically known as an RSA keypair.
I prefer to call it a
Machine keypairbecause they let you access machines in any cloud you set up.
# Step 1
wget -o keypair-sg.ps1 https://s3-us-west-2.amazonaws.com/cloudgeniuscode/keypair-sg.ps1

# Step 2
./keypair-sg.ps1
This step above also includes a provisioner for the Cloud Genius Workstation and sane default settings for VScode.
Create Cloud Genius Workstation in the AWS Cloud
# Step 1
wget -o workstation.ps1 https://s3-us-west-2.amazonaws.com/cloudgeniuscode/workstation.ps1

# Step 2
./workstation.ps1
Now you can use VScode to connect to the Cloud Genius Workstation in the AWS Cloud

Note that the 28 GiB EBS SSD disk /dev/sda1 is mounted at / mountpoint
28GiB Gibibyte is approximately equal to 30GB Gigabyte.
Read more about the details of binary (Gibibyte) and decimal (Gigabyte) measurements of disk size.
https://en.wikipedia.org/wiki/Gigabyte
ubuntu@CloudGenius:~$ df -H
Filesystem      Size  Used Avail Use% Mounted on
/dev/root        30G  3.0G   27G  11% /
devtmpfs        492M     0  492M   0% /dev
tmpfs           498M     0  498M   0% /dev/shm
tmpfs           100M  852k   99M   1% /run
tmpfs           5.3M     0  5.3M   0% /run/lock
tmpfs           498M     0  498M   0% /sys/fs/cgroup
/dev/loop0       27M   27M     0 100% /snap/amazon-ssm-agent/4046
/dev/loop1       65M   65M     0 100% /snap/core20/1081
/dev/loop3       34M   34M     0 100% /snap/snapd/13170
/dev/loop2       59M   59M     0 100% /snap/core18/2128
/dev/loop4       71M   71M     0 100% /snap/lxd/21545
tmpfs           100M     0  100M   0% /run/user/1000
Get a bigger size machine LATER
NOT TODAY but when later you need more RAM for certain exercises in the future.
# Step 1
wget -o bigger-workstation.ps1 https://s3-us-west-2.amazonaws.com/cloudgeniuscode/bigger-workstation.ps1

# Step 2
./bigger-workstation.ps1